On March 29, a partial solar eclipse will be visible from parts of the northeastern U.S., northeastern Canada, Eastern Europe, northwest Africa and Russia. Any eclipse is a fascinating event to observe and provides a glimpse of the celestial mechanics of the solar system.
According to NASA, there will be 224 solar eclipses visible on Earth in the 21st century, only 68 of which will be total solar eclipses. While they seem to occur quite frequently, a total solar eclipse is a rare event that you may only witness a few times in your lifetime due to your location and visibility conditions. So, planning and preparation are vital if you're hoping to capture some incredible shots. You'll need access to good equipment, along with an understanding of composition and how to make the most of your camera settings ahead of time since you'll only have a few minutes to take your pictures on the day. This guide will take you through all the steps you need to take to set yourself up for success.
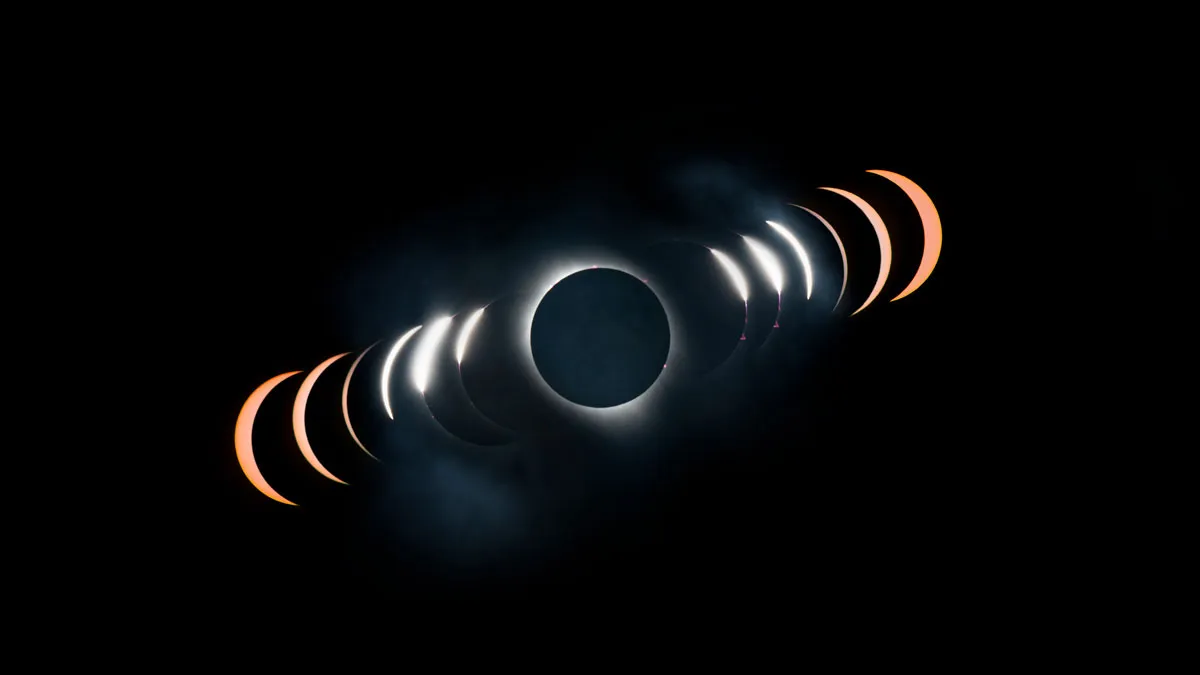
A total solar eclipse is one of nature's most spectacular phenomena, and it's only made possible through a series of cosmic coincidences. Although the sun is around 400 times larger than the moon, it is also around 400 times further away, meaning that the two celestial bodies appear to be around the same size as they're viewed from Earth. When the moon's orbit occurs in just the right place, this allows it to completely block out the sun for a short period of time, known as totality.
Useful gear for photographing the eclipse
Need something to equip your camera lens or telescope with? Here are three top products we recommend for photographing a solar eclipse.

White light filter designed to clamp onto binoculars, camera lenses and monoculars, this filter is well built and provides great views of the sun.

A cheap solar filter to attach to your telescope, camera lens or spotting scope for easy solar viewing, but it's not designed to last forever.

Made specifically for solar photography, this filter can screw onto the front of camera lenses and telescopes, although it doesn't claim to block any of the harmful rays.
Safety

It's important to consider the safety of you and your equipment when observing and photographing the solar eclipse. Make sure you never look directly at the sun without wearing proper solar eclipse glasses to protect your eyes during the partial phases of the eclipse, even if you're viewing through a telescope or binoculars. Doing so runs the risk of burning your retinas, which can cause instant and irreversible blindness, so be careful to ensure your kids take heed of this advice too. Read our in-depth guide on safe sun observation.
When observing a total solar eclipse, it's safe to remove your eclipse glasses during the short period of totality, which can last as long as four and a half minutes in some locations, but this only applies if you're in the path of totality where the sun will be entirely covered by the moon. You should replace them as soon as the diamond ring starts to appear again, signaling that totality is over.
The same rules apply to your photography equipment, which is also sensitive to the powerful rays from the sun. Luckily, the film used for solar viewing glasses is also available as a solar filter for your lens from specialist retailers. Solar film is the equivalent of 20 stops of neutral density, significantly reducing the amount of light getting through. Pointing a telephoto lens at the sun without protection for your gear is a terrible idea. A telephoto lens magnifies the intensity of sunlight and, in extreme cases, can melt your sensor!
In 2017, photographer Sean MacDonald sacrificed a Canon DSLR to prove this point. With a 400mm lens pointing directly at the sun and unfiltered, the camera began smoking within seconds.
What camera should I use for the solar eclipse?

Solar eclipses can be photographed in a number of ways, including smartphone photography, wide-angle compositions and telephoto composites.
A popular way to photograph a solar eclipse is by using a smartphone camera. However, this style of solar photography presents a few challenges, as direct exposure to the sun will result in a generally overexposed image, with flaring visible as light becomes diffracted through multiple lens elements.
As we observed with the total solar eclipse on April 8, 2024, a widely used technique was to photograph the eclipse through a pair of solar eclipse glasses. This is a safe option recognized by the ISO 12312-2 standard.
The next consideration is whether to use a mobile tripod. We advise using a tripod, but with careful positioning, you can capture images with a handheld smartphone. By adjusting the exposure dial on your phone's camera settings and further reducing the exposure value of your image, you can capture a defined solar disk with the partial stages of the eclipse becoming more apparent.
For more tips, see our guide on how to photograph a solar eclipse with a smartphone.

If you are looking for further clarity, we advise using a full-frame or crop-sensor camera because of its advanced technology and full manual control of the exposure. We think the best camera overall is the Nikon Z8 because it has a powerful 45.7MP sensor and reliable autofocus for astrophotography subjects. Your camera can be used with a combination of lenses and solar filters to capture the various stages of the eclipse. You should probably clean your camera sensor too, as photographing strong light means any specks of dust will be seen on your image. If you're uncertain how to do this, find out if your local camera shop offers a professional cleaning service.
Lenses and filters for photographing the solar eclipse
Shooting wide will result in images that capture the course of a solar eclipse over a greater scale, and these photos can lend themselves to a series of compositions. A good start is any lens of 20 millimeters or larger. These are rendered as composite images, using a sturdy tripod to capture a base image before the eclipse and layering filtered images of the sun to demonstrate its progression.

You will need a solar filter to capture these images. Baader produces its own "Astrosolar" film that meets the ISO 12312-2 standard and the CE standard and reduces the intensity of sunlight by 99.999%. Pieces of board are cut to size and placed in front of the optical lens element. This is by far the safest way to photograph the sun while filtering its white light.
When you're taking longer-duration photographs, we also recommend bringing several extra fully charged batteries.
If you're looking to capture photos of a greater image scale, you'll need a zoom lens. Greater focal lengths will result in more defined images, and they are more susceptible to minor movements and adjustments at this scale. We advise using a remote shutter release to reduce any sudden movements.
You will need a substantial focal length to get a close-up of the solar eclipse. The most common telephoto lenses tend to top out at 200mm or 300mm, very respectable focal lengths, but still, you're wasting precious pixels on empty space. Consider investing or renting a lens with a longer focal length for your mission. You could also look at a teleconverter, which is a secondary lens that fits between your lens and the camera body to magnify the center of your image. These typically come in factors of 1.4x, 1.5x or 2x magnification. For example, a 70-300mm lens with a 2x teleconverter offers a maximum focal length of 600mm.
Here is how a selection of different focal lengths look on the Nikon D850, a full-frame DSLR camera:


It may seem tempting to go for the closest, most extreme crop. The real attraction of a total solar eclipse is the chance to see and image the Sun's corona, which is a halo of whitish light around the sun that's only visible during totality. Use a tight crop and you risk cutting off the Sun's corona. You'll also find yourself having to adjust your composition constantly — it will surprise you just how quickly the sun will move through the frame. You will find that something between 400mm and 800mm is the best choice for the shot — striking a balance between filling your frame and not having to recompose your shot as often.
Why you need a sturdy tripod

You have several options for positioning your camera when photographing the eclipse. A stable and sturdy tripod is foremost recommended, especially when you're using greater-focal-length lenses (100 mm and up). A geared head such as the Benro GD3WH 3-Way geared head is a great option. In addition to being durable and capable of handling heavier payloads, the geared head allows for fine adjustment to your composition when you're taking consecutive images.
Understandably, solar eclipses can occur over a period of hours, and it becomes cumbersome to move your tripod head every few minutes. The next stage is to consider one of the best star trackers, which are great for tracking celestial objects in pace with Earth's rotation. Most trackers allow for fine-tuned tracking and are preferred for solar eclipse photography.
The only caveat is that star trackers require polar alignment. This could be done the evening before, or you could use specialist astronomy software to perform a daytime alignment. By locating the north celestial pole, you will get a more accurate alignment the day before, but if you misplace your equipment, it will affect your alignment.
The next best option is to use your smartphone with an alignment app, such as Polar Scope Align Pro. There are smartphone holders that allow you to attach your phone to your tracking mount. Your phone denotes the latitude and azimuth of the north celestial pole with a bull's-eye visual. This is only an approximate alignment; it will not be as precise as a polar alignment executed at night. Nonetheless, with minor sidereal movements, it is enough to keep the sun in the frame during the eclipse.
Camera settings for photographing the solar eclipse

With a solar filter in place, you limit the amount of light that enters the camera. Therefore, you do not need to use the widest aperture. A value between f/4 and f/8 is usually suitable to retain a sharp image and a greater depth of field.
A low ISO — between 100 and 400 — will retain detail in the solar disk, and the shutter speed can then be determined. This value will vary depending on your setup, but the general rule of thumb is to look at your camera's histogram with an off-peak to the left. The solar disk should be evenly exposed, with no "peaking" or overexposure across the disk.
Make sure VR/IS is turned off. Vibration reduction or image stabilization is not required while on a tripod. In fact, leaving it turned on will certainly result in a poorer image because your lens will be hunting for motion that isn't there.
Shooting raw allows you to capture a greater dynamic range and provides more data to play with during the editing process. Choose spot metering as your metering mode because your entire frame is going to be dark apart from the sun. Meter on the sun before the event begins.
You may wish to bracket your exposures. This is a technique where you take a sequence of images in quick succession, some correctly exposed, some overexposed and some underexposed. Most cameras have this feature built-in to take between three and nine images with various increments of exposure. As you're shooting in aperture priority with a fixed ISO, your camera will compensate by increasing and decreasing the shutter speed for the other frames in the sequence.
Focusing and composition
The easiest way to focus on the sun is to use your camera's built-in digital magnifier or zoom option. Use the focus wheel on the barrel of your camera's lens to fine-tune your focus along the edge of the solar disk. This should result in a crisp edge. Sunspots may aid in fine-tuning your focus.

After planning the position of the sun using the steps above, you can decide on the photo's composition. This can be determined by the position of the sun when it's nearing the point of first contact, when the moon first begins to eclipse the sun. This is why wider lenses are preferred to capture the apparent motion of the sun over a greater area.
For telephoto images, keep the solar disk as close to the center of the frame. Timed frames can be used in a composite image to demonstrate each stage of the eclipse.
How to prepare and plan for the solar eclipse
Solar eclipses require planning and vary greatly depending on the geographic location. A great resource is TimeandDate.com, which provides information on upcoming eclipses for any given location. By entering your location, you can see what the eclipse will look like and the timing for each phase.
You can use astronomy software and apps to see where the sun will be located during the eclipse. Stellarium is a great piece of software for locating these positions in astronomical degrees from your location.
The next consideration is the weather. Unfortunately, forecasts can change dramatically and with limited warning, so always be prepared to travel where needed for clear skies. Look at multiple forecasting models to obtain an accurate reading from your location.
Make sure to adjust your camera's internal clock. This will help you accurately track the various stages of the eclipse when you're compiling your own images of the event.
Solar eclipses explained
Solar eclipses happen when the moon passes between Earth and the sun, casting a shadow on Earth and blocking some or all of the sun's light. The March 29 eclipse will be a partial solar eclipse, which involves multiple phases (though not as many as a total solar eclipse).
First contact is when the moon first begins to "touch" — from our perspective on Earth) — the sun. Second and third contact apply to total, annular and hybrid solar eclipses. Second contact marks the beginning of totality, where the moon has covered all of the sun’s disk. Third contact marks the end of totality, where the moons starts to move away from the sun’s disk. Fourth contact marks the end of the eclipse, where the full solar disk is once again visible.

Types of Solar Eclipse
A total solar eclipse is the most impressive type of eclipse. It occurs when the moon is close enough in distance to the Earth to completely obscure the sun. The path of totality is narrow, so although a total solar eclipse occurs somewhere on Earth every 18 months or so, it takes an average of around 375 years to reoccur on the same spot.
An annular solar eclipse occurs when the moon's elliptical orbit takes it a bit further away from Earth, so it doesn't appear large enough to completely obscure the sun, instead leaving a bright 'ring of fire' around the edge. They occur on average every 18 months, and on the same spot around every 224 years.
A hybrid solar eclipse is a rare phenomenon where the eclipse transitions between an annular and total solar eclipse due to the curvature of the Earth affecting the perceived size of the moon. They make up only around 5% of all solar eclipses and occur around once a decade.
A partial solar eclipse is when the moon only covers some of the sun, making it look like a bite has been taken out of the side. During total or annular solar eclipses, people can see this when they're observing from just outside the path of totality, but partial solar eclipses also occur independently when the moon rests slightly above or below Earth in its orbit.
Upcoming solar eclipses
Partial
- March 29, 2025 - A partial solar eclipse will be visible from the northeastern U.S., northeastern Canada, Eastern Europe, northwest Africa and Russia.
- Sept. 21, 2025 - A partial solar eclipse will be visible from Antarctica, New Zealand and the South Pacific region.
Annular
- Feb. 17, 2026 - An annular eclipse will be visible from Antarctica.
- Feb. 6, 2027 - An annular eclipse will be visible from parts of western Africa and parts of South America.

Total
- Aug. 12, 2026 - Europe will next experience a total eclipse in 2026, which will be visible from Greenland, Iceland and Spain. Weather permitting, several large cities will see totality, including Reykjavik, Bilbao, Zaragoza and Palma. Most of western Europe will experience a partial eclipse.
- Aug. 2, 2027 - The path of totality for this 2027 eclipse travels across North Africa and the Middle East before terminating over the Indian Ocean. Egypt will see the longest period of totality, up to 6 minutes 22 seconds, near the city of Luxor, making this the second-longest solar eclipse of the century. Given the climate, time of day and exceptional length of totality, this is likely to be the most favorable viewing position for any solar eclipse in this decade.
Editor's Note: If you snap an amazing eclipse photo and would like to share it with Space.com's readers, send your photo(s), comments, and your name and location to space@futurenet.com
Join our Space Forums to keep talking space on the latest missions, night sky and more! And if you have a news tip, correction or comment, let us know at: community@space.com.

You must confirm your public display name before commenting
Please logout and then login again, you will then be prompted to enter your display name.
